Tacoma Fan Switch Not Working

Fan switch
The fan blower switch failing on the Toyota Tacoma (2005-present) is a common issue with this model of truck. Below describes the back story and the five step process to bring the unit back to life. The synopsis:
- Check fan motor fuse
- Clean/replace cabin air filter
- Check, fix, possibly replace fan resistor connector
- Check and possibly replace fan resistor pack
- Check, clean, possibly replace fan motor
There is a TSB (Toyota service bulletin) regarding this issue, T-SB-0149-11: HVAC Blower Motor Only Operates On High.

Are you dedicated to your goal?
As a polar explorer and motivational speaker, I want and need things to work correctly. If this fan switch (and everything else) aren’t working correctly, I’m motivated to fix it. Especially when it’s 90 degrees out and I’m driving to make a speech.
I’d rather it be cool and comfortable inside. In fact, I want to slog through ice in a frozen lake rather than fight with my vehicle.
T-SB-0149-11 (Click to download)
Back story
For some of my expeditions, backpacking trips, and adventures, I use my 2005 Toyota Tacoma to reach the backcountry only accessible by 4-wheel drive. Overall, the vehicle has been very good and has provided me with years of reliable service. As I have 260k+ miles on it, I’m not surprised there have been some issues.

Tacoma
However, recently the fan motor switch began to malfunction. The fan only worked on the high setting. Although that was okay, it was annoying because I rarely run the fan at full blast, as the air coming through the vents is pretty loud and dampens out the sound from the audio books I listen to. Plus, with the air conditioning or heat running, the full setting makes the cabin too hot or cold.
Surfing around I found this site which has over 10 pages of people discussing the problem with their Tacomas, model year 2005-present. Apparently the connector used in the fan resistor assembly isn’t designed to carry this much current. Why Toyota doesn’t change the design for a known issue is beyond me, but suffice to say it’s a problem. There are several fixes floating around. I found I had to do all four to get things working properly again.
I initially disconnected the wiring harness from the resistor assembly. The connector was burnt as others had noted. Seeing the female part of the connector was blackened, I used a small flat head screwdriver to scrape off the oxidation. Lo and behold, the fan started working correctly. Great! Or, so I thought.
Then, 2 days after I returned to Jackson, WY, the fan quit working completely. Having the fan completely working, then only working on high, then die was frustrating. Without a little air blowing into the cabin, the air temperature becomes uncomfortable rather quickly. Although I rolled down the windows to cool off, I knew that “fix” would only work for so long. Even though I’d checked and fixed everything else, I thought it was the motor or the fuse. All the fuses looked okay, so I guessed it was the motor. With the fan switch on, I tapped the motor housing. It started working, as other people had mentioned. So I knew there was a fix to be done in there, too. This fix (thus far) cost nothing and saved me $150+ for a new fan/motor from the dealer.
As a motivational speaker and polar explorer, I thought I’d document this to hopefully help some people out. Good luck! Be motivated to fix this problem.
Note that some dealers have told customers they would have to replace the $1200 wiring harness to fix this problem. One thing about this write-up. If you turn the switch, hit the AC button and the AC light doesn’t come on, your problem may not be fixed by the below.
5 step process for getting your cabin fan switch working again
General – Make sure to unhook the negative terminal of the battery. You don’t want the fan coming on or shorting the resistor pack. Bad things will happen.
Check the fan fuse
If the fan fuse is blown, replace it.

Glove box piston
Cabin air filter
Even though the 2005 manual states there is no air filter, that just means the vehicle didn’t come with one originally, there is actually a slot for it. If you do not have the filter installed, purchase one from a second source. Find it on Amazon, Google, and the like. The dealer will charge $35-$50. I’ve found them for $9 online.
If you have a funny sound when running the fan, junk stuck in the fan

Cabin air filter
or flapping around the filter might be the reason. It is very easy to remove the filter, clean the junk out, replace the filter, and possibly fix the noise. Make sure the fan is off and the battery is disconnected!. I wouldn’t want my hands in the fan area if it turned on. That squirrel cage fan is powerful.
A dirty filter will cause the fan motor to work extra hard and overheat, leading to the other issues causing the fan not to work. Leaves, junk, or other material can block this filter, make funny smells, and generally cause problems for this filter.
Procedure:
- Empty glove box
- Open glove box and detach piston
- Pinch side of glove box to drop it down, then gently pull it up until disconnected
- Open tabs for cabin air filter (may need flat head screw driver
- Lift up and pull out air filter, being careful not to drop detritus into fan. The filter snags on the side tabs, be careful
- Inspect and or replace filter
- Reverse procedure to reinstall glove box
Fan switch resistor connector

Cabin air filter system
The next problem is with the fan switch resistor connector. From what people say, the connector is not correctly spec’d out for the current load the fan and resistor demand. I’m not sure if that’s the case, but the burnt connector suggests that.
Fan wire harness
The connector, fan, wiring harness and such can be found in the passenger floor area, just under the glove box. On the left, you can see a connector with 4 wires sticking out of it. That is where the resistor for the fan is. If you gently pry back the tab and pull down
the connector, you will be able to see how your connector is doing. You may also have to release the black tab holding the wiring harness to the fan. The connector may be snug in the resistor pack. Be very gentle when pulling it out.
Once you have the connector out, look at it. Most likely you will see a burn mark. If you look inside the female part of the connector, you will see that the burnt connector’s metal tab is more open than the other connectors. This is one of the reasons the fan quits working on

Burnt connector
all but the highest fan setting. The fan does not use the resistor pack when it’s on high. The fan is connected directly to the 12V system. The green pushpin marks the burnt connector.

Connector pins
The first fix is to use the push pin, shove it into the top side of the connector and remove the pins. You may have to remove all 4 pins to get at the burnt one. Mine was very stuck and took a lot of force to pull

Take a picture
out. Be wary – you don’t want to break this. Make sure to keep track of which wire goes into which hole. You can seriously wreck

Burnt connector pin
something if you plug everything in backwards. Take a picture – it’ll save a lot of grief.
Once you pull out the pins, take a look. More than likely you’ll see burnt plastic on the pin. Gently scrape it off. Then use your pushpin to reshape the connector so the opening is much smaller, matching the others. Be careful. I used Deoxit to clean all of the pins since I’d taken it apart anyway. It’s worth the extra 2 minutes. Reinsert the pins in the proper order and test your fan switch. More than likely, everything will be working again.
The TSB (linked above) suggests chopping and splicing in a new connector. You don’t necessarily need to do this. If you remove all the pins, you should be able to salvage them. Instead of paying the $34 the dealer wants for the connector, order the parts at Mouser.com. (They’re a major & reliable electronics supplier I’ve used for night vision systems) This part was suggested on the above linked forum. It’s on order but I won’t need it but as backup. You can remove just the pins, recrimp and new pin, and insert them in the new connector. This saves a lot of cut & splice work compared to what the TSB suggests.
Replacement connector, part num 12129565-B, Mouser num 829-12129565-B
Replacement pins, part num 12162597, Mouser num 829-12162597
Fan switch resistor

Blower Resistor Specs
The next issue might be the fan switch resistor. You have to remove the resistor and inspect the resistor pack to see if it’s still functional. Download this picture and test out the resistor pack.

Remove with socket
The one difficulty with making these measurements is I don’t have an instrumentation grade multimeter to do the tests. As this resistor has resistances below 1 ohm, my multimeter’s lead resistance at 0.7 ohms swamps out any accurate measurement.
Procedure
- Use a 5.5mm socket to unscrew the front and back screws on the resistor
- Gently pull out the pack and inspect
- Replace if the pack doesn’t meet specs

Resistor pack
You won’t be able to get a full socket in this space, so I just used a 1/4-3/8 step up socket and hand twisted it. The thing you are looking for here is if there are any opens. Usually when resistors fail, they fail open, so that’s easy to detect. My resistor pack has a little rust on it, so it may fail one day.
Toyota has since improved the design of the pack with thicker connectors and a totally different ceramic design. As mine is not defective, I didn’t have to replace it. Also, I found a resistor pack on Amazon for $30, less than what the dealers demand for this part. Also, there’s another vendor online that sells them for cheap, but they want $19 for ground shipping. Absurd. That’s overnight pricing. Shop around.
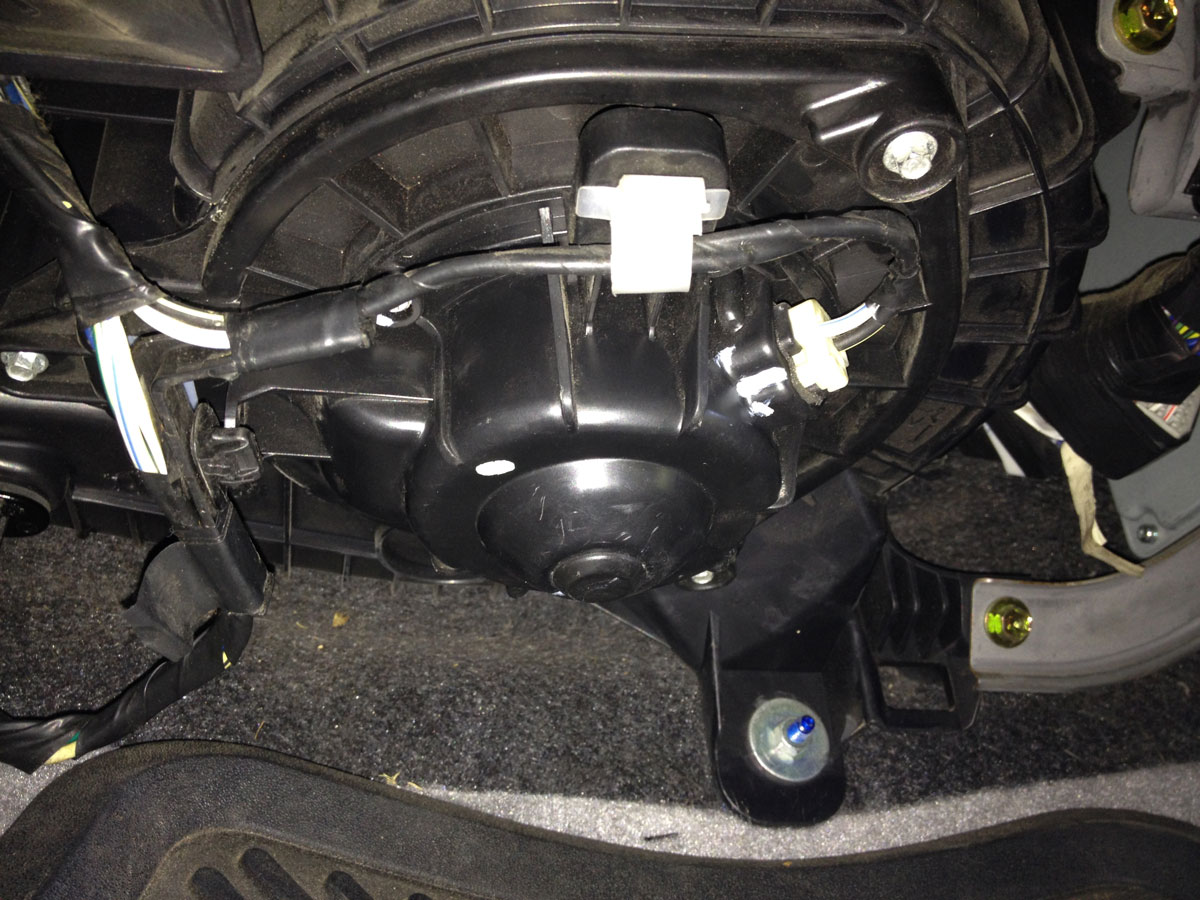
Fan unit and motor

5.5mm socket
After you have check the fuse, the connector, the resistor, and the cabin air filter, the remaining item to check is the fan. As everything else was fixed or cleaned, I figured out the problem was with the fan

Disconnect wire harness
by tapping the housing. When the fan didn’t work on any setting, I turned it to full on and hit the fan housing with my hand. The fan started working. So my guess was that there was junk blocking up the motor. Sure enough, it was. Pulling the motor out takes about 3 minutes.

Pull down assembly
Procedure
- Disconnect ground harness from battery
- Disconnect the wire harness from the black tab and the white hook
- Use a 5.5mm socket to remove the 3 screws holding the fan assembly in
- Pull the fan assembly out. It’s snug, so it may need some force

Motor case screws
Do the rest of the work on a workbench to protect the motor
- Remove the 4 screws on top of the motor enclosure

Pull off case
- Pull off the plastic housing. Mine was pretty snug, so it may take some force. DO NOT damage the electrical connector
- Remove the 2 screws holding the metal housing of the motor
- Place the fan on the workbench, then gently
Lift motor cap off
lift the fan metal housing up. The motor spindle rides in brass bushing, so lift vertically. The spindle may flop to the side, as the motor has permanent
Motor interior
magnets. Be very careful not to damage anything
- Inspect the brushes, stator, and fan


Be careful, as the rotor can wobble back and forth without the cap on. You can easily damage the brushes and be dead in the water! This is where I found a ton of dust mixed in with copper filings. Of course

Cleaned motor
the copper filings are bad, as they finally made the motor stop working. Perhaps fixing the resistor connector did it, who

Brushes vs rotor
knows. In any case, clean all of the junk out of the case area. As my truck has 260k miles on it, there were a lot of copper shavings in there.
One thing to note – look at the picture of the brushes where they contact the rotor. You will see that the copper on the rotor is very worn down. I can only assume the brushes are a bit too hard, as they’ve abraded the copper way down. Usually it’s the brushes which are supposed to abrade and wear out (defect??). In any case, that copper was all over everything inside the motor. On the armature, rotor, stator, inside the fan, surrounding the capacitor and anything else. I used a can of air to blow all that junk off the motor. Some people have suggested WD-40 or petroleum jelly as a lubricant. I didn’t use that, as I didn’t want more junk copper sticking to things and shorting the motor out. Get it clean.

Lid and fan
When you put the motor cap back on, make sure to align the rotor perfectly, do not chip the brushes and, whatever you do, don’t short out or damage the wires leading to the brushes. A little bit of caution will save you a lot of $$$. Once you get the cap back on, screw it together and reverse the disassembly procedure.
The moment I cleaned out the motor, it worked on all settings instantly and without hesitation. I surmise that the fan problem was a combination of the burnt connector and copper/dust crud inside the motor in this instance.
If you found this helpful, please stop by my photography site and my book site and check out the work I do. If you need high-end product & commercial photography for advertising, banners, billboards or the like, I can make it happen.
Standard disclaimer – If you damage or wreck yourself or your vehicle, it is not my fault. It’s your fault. This material is all based on opinion and only what I did. When in doubt, consult with a professional.


You rock, Aaron!! My A/C fan first hiccuped on Monday, but turning the truck off and back on seemed to cure the problem the first time. Then today, Thursday, nothing worked. I checked the fuses and then removed the switch panel. Everything seems fine. Then I found your write-up. I followed it to check the resistor, which appeared and tested fine. I was convinced that I had a major problem. I took the fan body out and found a piece of weatherstripping in the blades. Not good – figured that had been there for a while and probably burned up the motor. However, I took the motor cover off and cleaned up a LOT of dust from the brushes. Once I put it all back together, it worked!!! Your pictures were a great help and gave me the confidence to keep taking parts apart until the problem was found and corrected. Let’s hope this will last and that there wasn’t anything else going on that I have yet to find. Thanks so much for your detailed write up.
I live in Sierra Vista, Arizona, but I’m going to Phoenix tomorrow. It was 117° there last Friday, sony wasn’t looking forward to making that trip without an AC fan.
Eternally grateful,
Roger H. Contreras
2006 Tacoma 4dr 4×4
204,329 miles
Hi Roger,
Glad to help! Having the fan die in my Tacoma was bad for summer heat and also the winter freeze.
Enjoy the trip!
FYI – I do motivational speaking and pay a referral fee for anyone who generates a paid booking for me.
Aaron
2005 Tacoma 4dr 4×4
280,000 miles
Aaron,
Hi. I just fixed the A/C in my 2005 Tacoma. I followed your excellent instructions and took apart the connector and cleaned all the pins, then took the blower fan out and clean it as well. I can’t thank you enough for taking the time to post this information online so that others can save a whole lot of money.
I called the local Toyota dealership in town and they wanted $24 per wire and pin. So with 4 wires and pins, that’s almost $100! That’s ridiculous for something that is a design flaw in the first place. My truck has 250K miles, so it’s definitely past warranty.
BTW – I grew up in Cheyenne, and I’m a UWYO Alumi. Jackson Hole is one of my favorite places on earth. 🙂 I live in Florida now and not a week goes by where I don’t miss the Rocky Mountains. I was actually able to go backpacking in early August up on the Snowy Range for 4 days. It was wonderful, amazing, inspiring and challenging. Being at almost 12,000 feet, my lungs were starving for more O2.
Anyway, thanks again. I am very grateful.
My Best,
Brian
Very nice writeup, helped me troubleshoot my fan not functioning, turned out to be the connector. Thanks.
Thanks for the post. Symptoms were: heater fan works on high only. No burn marks on plug or resistor pack. Just the standard “dust” on the cabin filter. Ordered a replacement resistor pack from Rock Auto for $25 and received it by USPS in 3 days ( $3 shipping). 10 minutes to replace the old one and voila! Works like it used to. Your links to the Toyota TSB were quite helpful as well. Thanks~!
You say check the fan fuse, but you do not say where it is! I have A 2013 Tacoma.
There are 2 fuse locations in a Tacoma. The first is left of the steering column, near the brake release. There’s a panel you can open and check fuses there. The second is in the engine compartment on the driver’s side. There’s a big black box with fuses in that. Check both of those locations, as the fuse position may have changed from my 2005 Tacoma.
So which fuse is for AC? Do I need to check each one of the fuse?
Thanks!
It’s either in the fuse box in the dashboard, below left of the steering column. Or it’s in the fuse box in the engine compartment.
Where is fan fuse located
Either in the bottom left of the dash, in the panel above the parking brake, or in the fuse box under the hood.
Thanks Aaron, your procedure for cleaning the fan motor worked perfectly. My 2007 Tacoma speed fan stopped working entirely (no speeds, not even high), worked for another day, then quit completely. The fuses were ok and I didn’t see any burnt connector so I didn’t think the resistor or connector was a problem. I pulled the fan and motor and the stator was covered with black dust so I cleaned it up with some alcohol and about 60 cotton swabs and paper towels. I put it all back together and it works. Thanks so much for the pictures and instructions. Best of luck with your speaking endeavors..
Hi Aaron. I want to thank you for your very detailed fixes. My wife and I went on holiday in Southern Alberta in my 2010 Tacoma. The temperatures were in the low 30’s C ( about 86 F) and coming home we stopped for a pit stop at a Dairy Queen and when we got started again, the A/C would not start. Checked the fuses, banged the dash ( hey, you never know ;-), and it refused to start. Well we put the windows down and continued our trek home ( about another 2 hours). 10 minutes later the A/C kicked on and stayed on the rest of the way.
Over the next couple of days it would work intermittently and then one day last week it just stopped.
So I found your link and started going down the steps. Replaced the filter and the resistor. Problem solved!!!
Ha thanks for the info, all I had to do was wiggle the wires at the resister and it started working! Not a very good mechanic (Disney School of Repair) so just knowing where to look was a great help, Thanks!
Ok my 2005 Toyota Tacoma Prerunner that I just finished bragging on bc I just hit100K miles has now decided to show me who’s boss.
It all started with the fan speeds MED, MED HIGH going off and then back on….now the fan will only run on HIGH…..well I’m into saving money bc that’s the way I have to live, so I found your website – you have the most detail and though I am intimidated…I think I’ll give your steps a try.
My question is regarding the cabin filter: I know there is not one in there, should I skip that step?? What do you recommend?
TIA for any advice you can lend,
Ann
It’s worth checking.
My truck actually had a cabin filter. It’s behind the glove box. Remove everything from the box. Gently pry off the piston holder. Drop the box slightly, then lift up. It takes a little force but not much.
Then you’ll see a slot where the air filter is just above the fan. This will also allow you to dig out the leaves and such.
Will do, thanks for the informative blog and your advice today
Good luck, let me know how it goes!